Soil Mechanics
Maximiliano Garnier-Villarreal
2026-05-26
Source:vignettes/soil_mechanics_vig.Rmd
soil_mechanics_vig.RmdThis document highlights some functions of the GMisc
package related to soil mechanics problems.
Bearing capacity
The idea here is to provide a function that solves the bearing capacity equation for different types of footings, giving as a result the ultimate (q_u) and allowable bearing capacity (q_a):
q_u = 0.5 \ B \gamma N_\gamma s_\gamma d_\gamma + D \gamma \left(N_q-1\right) s_q d_q + c N_c s_c d_c
q_a = \frac{q_u}{FS}
where B is the width in meters,
D is the embedment depth in meters,
FS is the desired factor of safety,
c is the cohesion in kPa (referred as
tau0 in the function), \gamma is the unit weight in kN/m^3, and the rest of the parameters are
correction factors dependent on these input values, the internal
friction angle \phi, the type of
footing (“strip”, “square”, “rectangular”,“circular”), and the depth to
the water level.
The function that solves the above equation is
bearing_capacity, with the mentioned arguments but
specifying the wet/moist unit weight, saturated unit weight for their
respective use. The function outputs a table for q_u and for q_a and graph for the results.
The B and D parameters can be vectors for
multiple cases comparisons or single values for a single case estimate.
If FS = 1 then the allowable and ultimate bearing
capacities are the same (q_a =
q_u).
Different scenarios can be analyzed:
- For a total stress analysis (TSA) in a cohesive soil (plastic silts
and clays) set the friction angle equal to zero (
phi = 0) and the cohesion equal to the undrained shear strength (tau0 = Su). - For an effective stress analysis (ESA) in a cohesive soil use the effective friction angle (\phi') and effective cohesion (c').
- For a coarse-grained soil (gravels, sands, and non-plastic silts)
usually TSA = ESA, and the friction angle and cohesion should be used,
and if the material has no-cohesion then set cohesion equal to zero
(
tau0 = 0)
Also different methods can be used to calculate the bearing capacity factors (N_\gamma, N_q, and N_c), such as “Vesic” (default), “Terzaghi”, “Meyerhof”, “Hansen”, “Michalowski” or “Davis & Booker”. Additionally the type of failure case can be specified and it can be either “general” or “local”.
We can define a set of parameters to use in different examples as follows:
B = seq(0.5, 2, 0.25)
D = seq(0, 2, 0.25)
L = NULL
gamma.h = 15.5
gamma.s = 18.5
tau0 = 10
phi = 30
FS = 3
wl = 1
The first example uses the default “square” footing:
bearing_capacity(B, D, L, gamma.h, gamma.s, tau0, phi, wl, FS)
#> $qu
#> # A tibble: 9 × 8
#>   `D/B` `0.5` `0.75`   `1` `1.25` `1.5` `1.75`   `2`
#>   <dbl> <dbl>  <dbl> <dbl>  <dbl> <dbl>  <dbl> <dbl>
#> 1  0     414.   440.  466.   480.  495.   510.  524.
#> 2  0.25  595.   596.  598.   605.  615.   626   638.
#> 3  0.5   807.   762.  746.   743.  745.   751.  759.
#> 4  0.75  929.   947.  909.   892.  886.   885.  888.
#> 5  1    1084.  1055. 1088.  1054. 1036.  1028. 1025
#> 6  1.25 1185.  1158. 1138.  1179. 1150.  1134. 1126.
#> 7  1.5  1281.  1256. 1237.  1222. 1271.  1246. 1231.
#> 8  1.75 1375.  1352. 1333.  1318. 1307.  1362. 1340.
#> 9  2    1467.  1446. 1428.  1413. 1402.  1393. 1453.
#>
#> $qa
#> # A tibble: 9 × 8
#>   `D/B` `0.5` `0.75`   `1` `1.25` `1.5` `1.75`   `2`
#>   <dbl> <dbl>  <dbl> <dbl>  <dbl> <dbl>  <dbl> <dbl>
#> 1  0     138.   147.  155.   160.  165.   170.  175.
#> 2  0.25  202.   203.  203.   206.  209.   213.  217.
#> 3  0.5   277.   262.  256.   255.  256.   258.  261.
#> 4  0.75  321.   327.  315.   309.  307.   307.  308.
#> 5  1     377.   367.  378.   367.  361.   358.  357.
#> 6  1.25  413.   404.  397.   411.  401.   396.  393.
#> 7  1.5   447.   439.  432.   427.  443.   435.  430.
#> 8  1.75  480.   473.  466.   461.  458.   476.  469.
#> 9  2     513.   506.  500.   495.  491.   488.  509.
#>
#> $Plot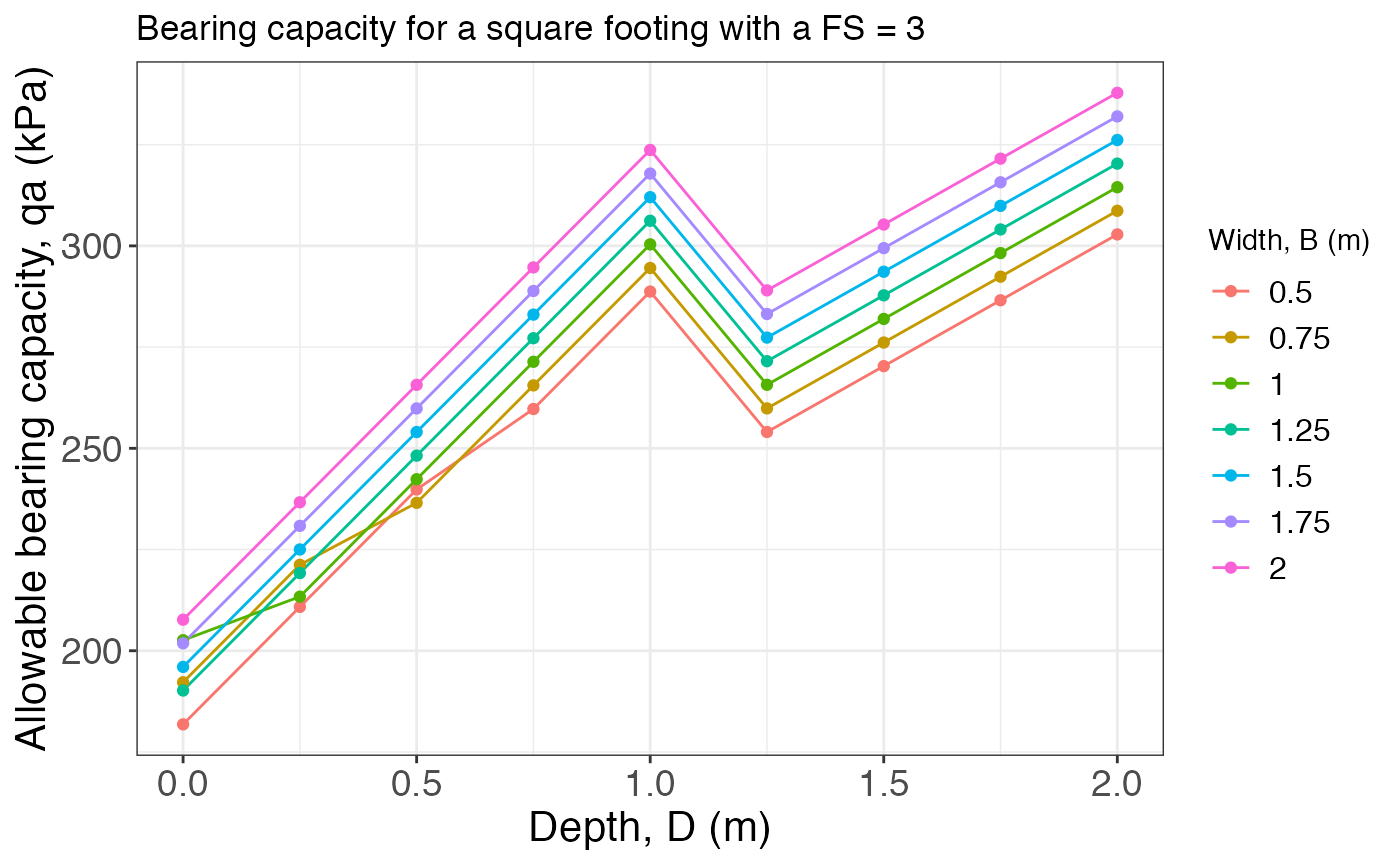
The second example uses the a “strip” footing:
bearing_capacity(
  B,
  D,
  L,
  gamma.h,
  gamma.s,
  tau0,
  phi,
  wl,
  FS,
  footing = "strip"
)
#> $qu
#> # A tibble: 9 × 8
#>   `D/B` `0.5` `0.75`   `1` `1.25` `1.5` `1.75`   `2`
#>   <dbl> <dbl>  <dbl> <dbl>  <dbl> <dbl>  <dbl> <dbl>
#> 1  0     388.   432.  475.   499.  524.   548.  572.
#> 2  0.25  515.   539.  553.   571.  592.   613.  636.
#> 3  0.5   661.   640.  641.   651.  667.   684.  704.
#> 4  0.75  727.   754.  738.   739.  748.   761.  777.
#> 5  1     816.   809.  846.   835.  835.   843.  854.
#> 6  1.25  882.   876.  875.   919.  912.   914.  921.
#> 7  1.5   944.   940.  940.   943.  992.   988.  991.
#> 8  1.75 1005.  1002. 1003.  1006. 1012.  1065. 1063.
#> 9  2    1064.  1063. 1064.  1068. 1073.  1081. 1138.
#>
#> $qa
#> # A tibble: 9 × 8
#>   `D/B` `0.5` `0.75`   `1` `1.25` `1.5` `1.75`   `2`
#>   <dbl> <dbl>  <dbl> <dbl>  <dbl> <dbl>  <dbl> <dbl>
#> 1  0     129.   144.  158.   166.  175.   183.  191.
#> 2  0.25  176.   183.  188.   194.  201.   208.  216.
#> 3  0.5   228.   221.  221.   225.  230.   236.  242.
#> 4  0.75  254.   263.  258.   258.  261.   265.  270.
#> 5  1     288.   285.  297.   294.  294.   296.  300.
#> 6  1.25  312.   310.  309.   324.  322.   322.  325.
#> 7  1.5   335.   333.  333.   334.  350.   349.  350.
#> 8  1.75  357.   356.  356.   357.  359.   377.  376.
#> 9  2     379.   379.  379.   380.  382.   384.  404.
#>
#> $Plot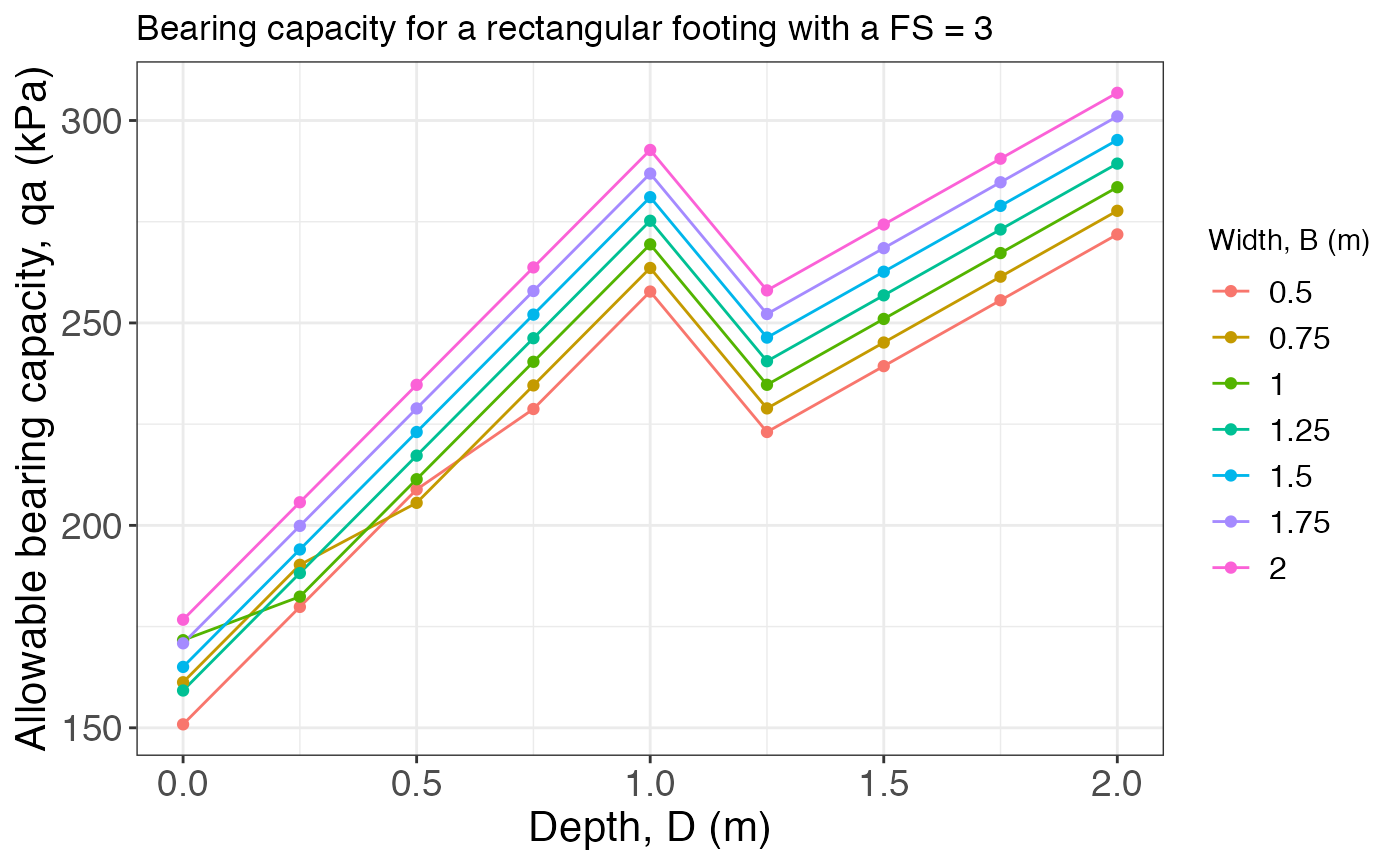
And the last example uses a “rectangular” footing, where it is needed
to define the L argument (the length of the footing in
meters):
bearing_capacity(
  B,
  D,
  L = 3,
  gamma.h,
  gamma.s,
  tau0,
  phi,
  wl,
  FS,
  footing = "rectangular"
)
#> $qu
#> # A tibble: 9 × 8
#>   `D/B` `0.5` `0.75`   `1` `1.25` `1.5` `1.75`   `2`
#>   <dbl> <dbl>  <dbl> <dbl>  <dbl> <dbl>  <dbl> <dbl>
#> 1  0     397.   434.  472.   493.  514.   535.  556.
#> 2  0.25  542.   558.  568.   583.  600.   618.  636.
#> 3  0.5   710.   680.  676.   682.  693.   707.  722.
#> 4  0.75  794.   818.  795.   790.  794.   802.  814.
#> 5  1     906.   891.  926.   908.  902.   904.  911.
#> 6  1.25  983.   970.  962.  1006.  991.   987.  989.
#> 7  1.5  1056.  1046. 1039.  1036. 1085.  1074. 1071.
#> 8  1.75 1128.  1119. 1113.  1110. 1110.  1164. 1155.
#> 9  2    1198.  1191. 1186.  1183. 1183.  1185. 1243.
#>
#> $qa
#> # A tibble: 9 × 8
#>   `D/B` `0.5` `0.75`   `1` `1.25` `1.5` `1.75`   `2`
#>   <dbl> <dbl>  <dbl> <dbl>  <dbl> <dbl>  <dbl> <dbl>
#> 1  0     132.   145.  157.   164.  171.   178.  185.
#> 2  0.25  184.   190.  193.   198.  204.   210.  216
#> 3  0.5   244.   235.  233.   235.  239.   243.  248.
#> 4  0.75  276.   284.  277.   275   276.   279.  283.
#> 5  1     317.   312.  324.   318.  316.   317.  319.
#> 6  1.25  345.   341.  338.   353.  348.   347.  347.
#> 7  1.5   372.   368.  366.   365.  381.   378.  377.
#> 8  1.75  398.   395.  393.   392.  392.   410   407.
#> 9  2     424.   421.  419.   418.  418.   419.  439.
#>
#> $Plot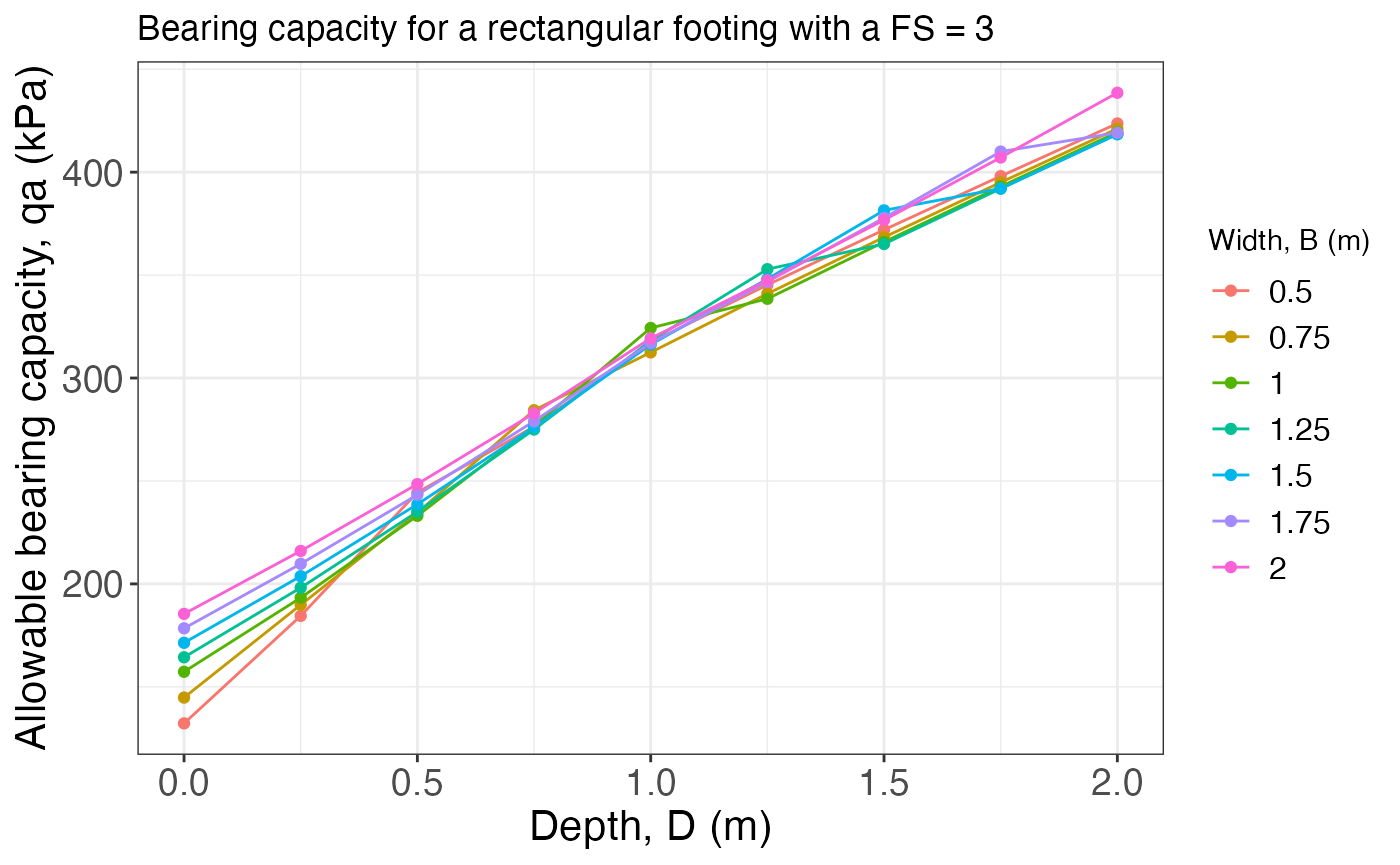
Induced stress
The function induced_stress calculates and plots the
stress distribution under the center or corner (for rectangular or
square footings) of a footing of different shapes (“strip”, “square”,
“rectangular”, or “circular”), using the solutions from Boussinesq. The
arguments of the function are qs: the stress applied by the
footing, B: the width of the footing in meters,
L: the length of the footing in meters (applies only for
rectangular footings), z.end: the depth down to which
calculate the stress, and rect.pos: the location for which
to calculate the stress (either “center” or “corner”). The function
returns a data frame with the stress values and two plots: one static
($Plot) and one interactive ($Plotly), the
last one is the one shown here.
The first example shows the plot for the default “strip” footing, and one value of width:
qs = 1
B = 1
L = NULL
z.end = 8
induced_stress(qs, B, L, z.end)$Plotly
The second example plots the results for a “square” footing and different widths:
qs = 1
B = c(1, 2, 4)
L = NULL
z.end = 8
induced_stress(qs, B, L, z.end, footing = "square")$Plotly
The last example plots the results for a “rectangular” footing and different lengths at both the center and the corner:
qs = 1
B = 1
L = c(1, 2, 4)
z.end = 8
induced_stress(qs, B, L, z.end, footing = "rectangular")$Plotly
induced_stress(
  qs,
  B,
  L,
  z.end,
  footing = "rectangular",
  rect.pos = "corner"
)$Plotly
Insitu stress
The insitu_stress function builds the vertical stress
profile with depth for a layered soil, returning the total stress, pore
pressure (when a water table depth NF is supplied), and
effective stress at every depth increment. The required arguments are
boundaries: a numeric vector of layer bottom depths (m,
strictly increasing), soils: a character vector of soil
names, and unit_weights: unit weights (kN/m^3) for each layer. The optional
NF argument sets the water table depth; omitting it (or
NF = NA) gives a fully dry profile. The function returns a
list with a data frame ($Profile) and a ggplot2 graph
($Graph).
Define a four-layer soil profile:
boundaries <- c(6, 12, 22, 30)
soils <- c("Sandy silt", "Fine sand", "Clay", "Gravel")
unit_weights <- c(18.9, 20.8, 19.0, 18.5)
Dry profile (no water table):
res_dry <- insitu_stress(boundaries, soils, unit_weights)
res_dry$Profile
#> # A tibble: 61 × 6
#>    Depth Soil       Unit_Weight Total_Stress Pore_Pressure Effective_Stress
#>    <dbl> <fct>            <dbl>        <dbl>         <dbl>            <dbl>
#>  1   0   Sandy silt        18.9         0               NA             0
#>  2   0.5 Sandy silt        18.9         9.45            NA             9.45
#>  3   1   Sandy silt        18.9        18.9             NA            18.9
#>  4   1.5 Sandy silt        18.9        28.4             NA            28.4
#>  5   2   Sandy silt        18.9        37.8             NA            37.8
#>  6   2.5 Sandy silt        18.9        47.2             NA            47.2
#>  7   3   Sandy silt        18.9        56.7             NA            56.7
#>  8   3.5 Sandy silt        18.9        66.2             NA            66.2
#>  9   4   Sandy silt        18.9        75.6             NA            75.6
#> 10   4.5 Sandy silt        18.9        85.1             NA            85.1
#> # ℹ 51 more rows
res_dry$Graph
Profile with the water table at 12 m depth:
res_wt <- insitu_stress(boundaries, soils, unit_weights, NF = 12)
res_wt$Profile
#> # A tibble: 61 × 6
#>    Depth Soil       Unit_Weight Total_Stress Pore_Pressure Effective_Stress
#>    <dbl> <fct>            <dbl>        <dbl>         <dbl>            <dbl>
#>  1   0   Sandy silt        18.9         0               NA             0
#>  2   0.5 Sandy silt        18.9         9.45            NA             9.45
#>  3   1   Sandy silt        18.9        18.9             NA            18.9
#>  4   1.5 Sandy silt        18.9        28.4             NA            28.4
#>  5   2   Sandy silt        18.9        37.8             NA            37.8
#>  6   2.5 Sandy silt        18.9        47.2             NA            47.2
#>  7   3   Sandy silt        18.9        56.7             NA            56.7
#>  8   3.5 Sandy silt        18.9        66.2             NA            66.2
#>  9   4   Sandy silt        18.9        75.6             NA            75.6
#> 10   4.5 Sandy silt        18.9        85.1             NA            85.1
#> # ℹ 51 more rows
res_wt$Graph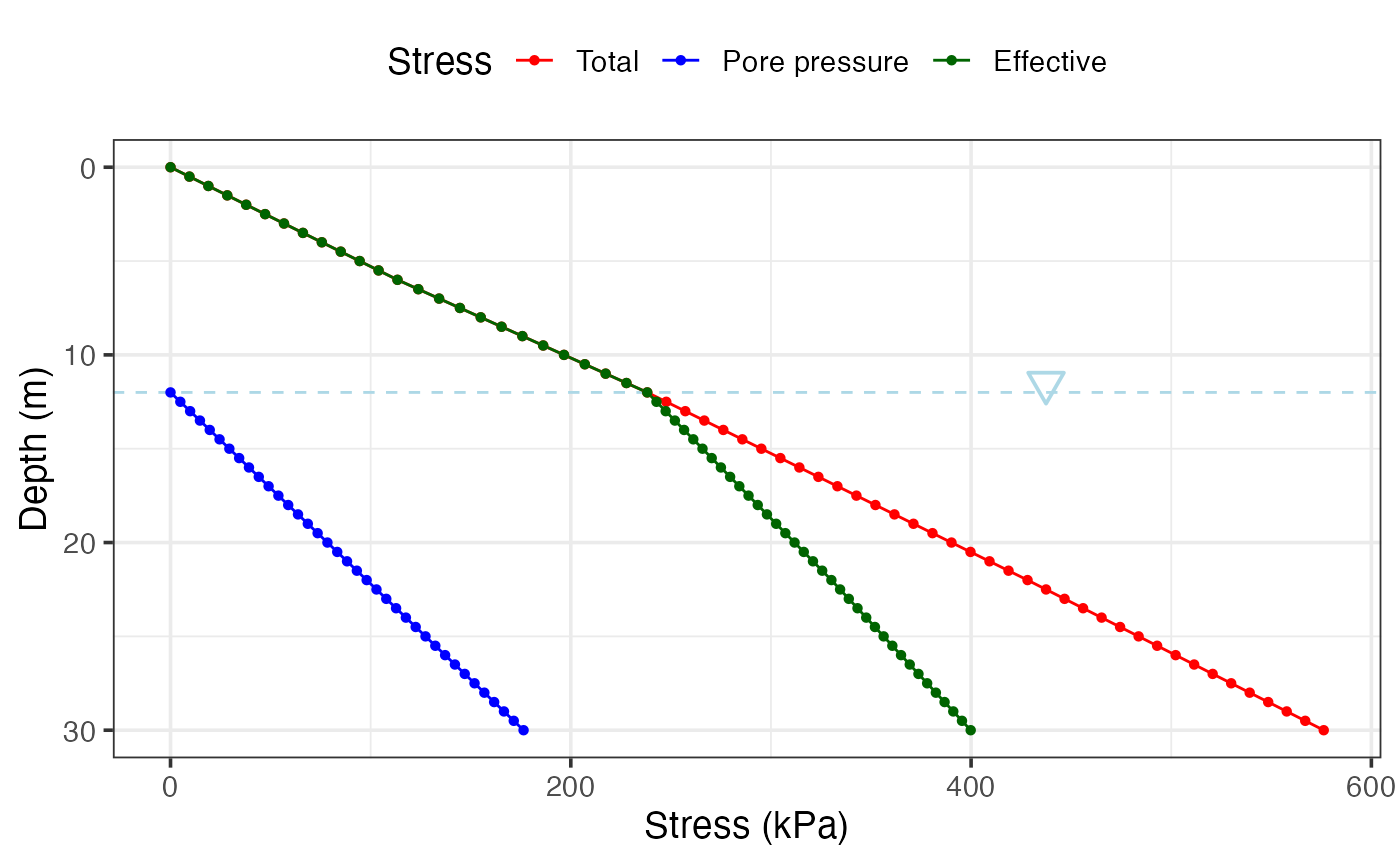
Consistency (Atterberg) limits
Casagrande cup liquid limit
Casagrande_LL fits a linear regression of water content
vs \log_{10}(N) from a Casagrande cup
test and estimates the liquid limit at N =
25 blows. If pl (plastic limit) is supplied the
function also returns PI; adding w (natural water content)
further returns LI and CI.
Liquid limit only:
Casagrande_LL(N = c(15, 20, 28, 35), W = c(42, 38, 34, 31))$plot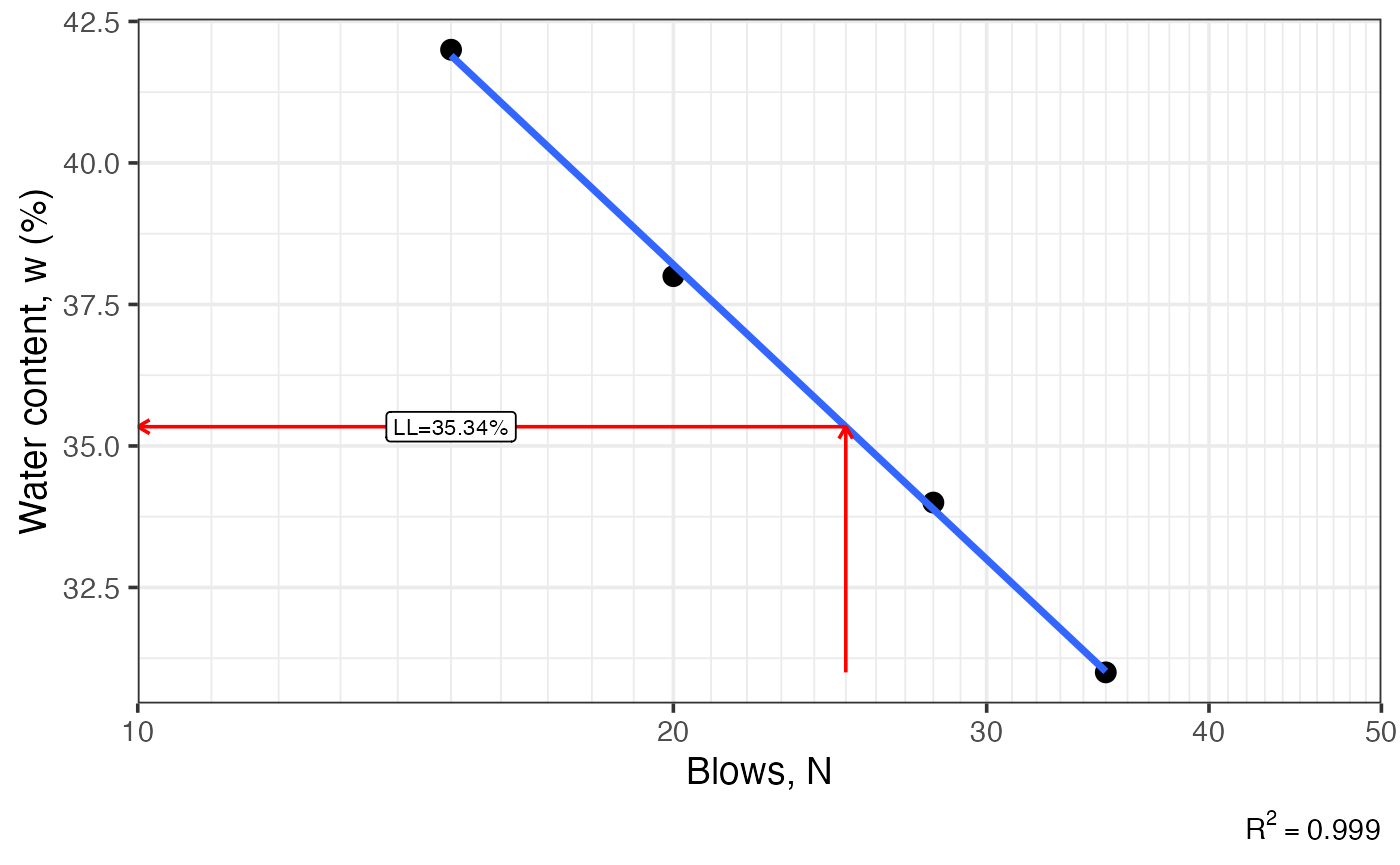
With plastic limit and natural water content (PI, LI, CI also computed):
res_ll <- Casagrande_LL(
  N = c(15, 20, 28, 35),
  W = c(42, 38, 34, 31),
  pl = 22,
  w = 30
)
res_ll$plot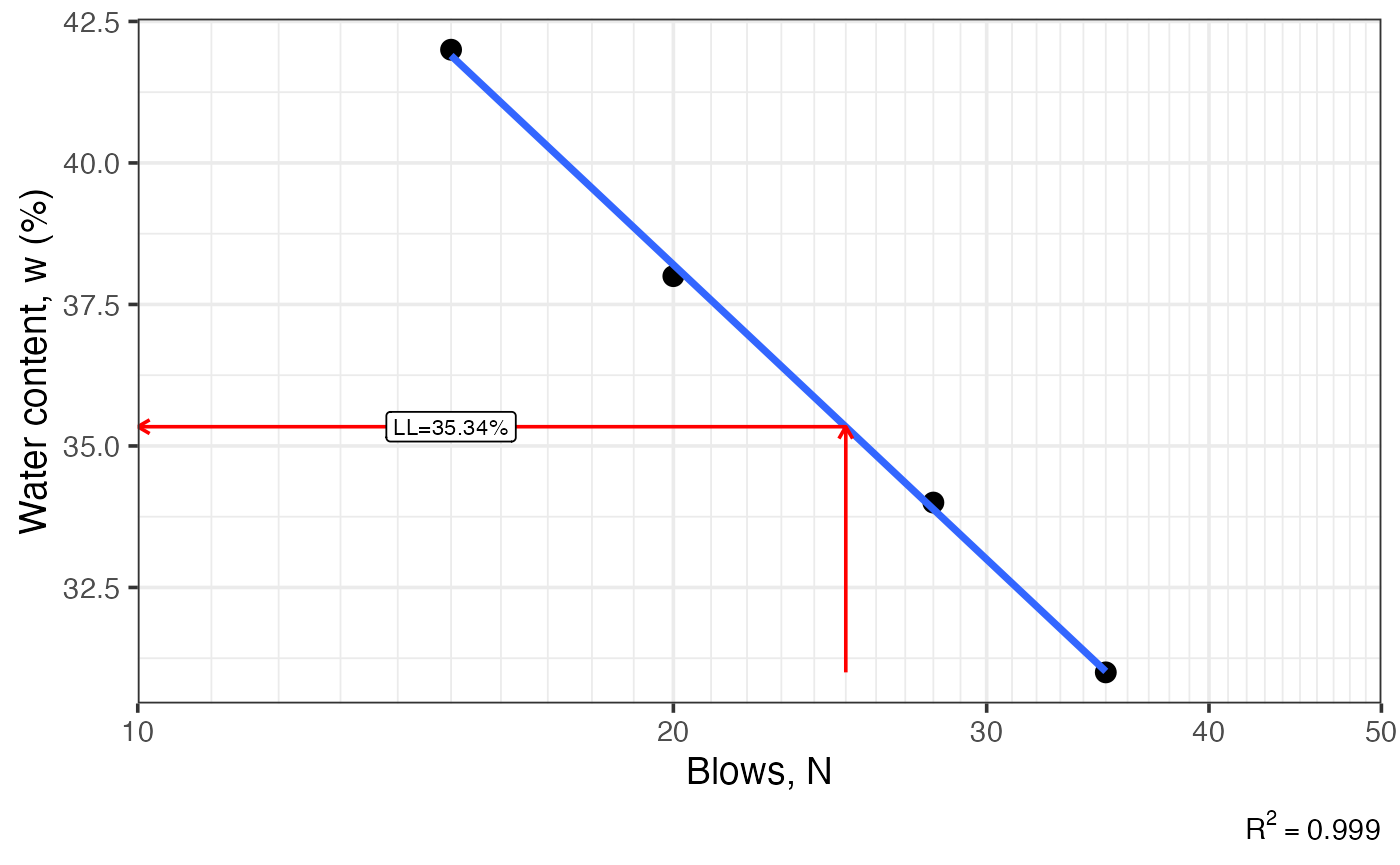
res_ll[c("ll", "pl", "pi", "li", "ci")]
#> $ll
#> [1] 35.34
#>
#> $pl
#> [1] 22
#>
#> $pi
#> [1] 13.34
#>
#> $li
#> [1] 0.6
#>
#> $ci
#> [1] 0.4
Fall cone liquid and plastic limits
fallcone_limits fits a log-log regression of w vs penetration from a fall cone test. Use
limit = 'l' for the liquid limit (80 g cone, 20 mm),
'p' for the plastic limit (240 g cone, 20 mm), or
'b' for both (PL estimated at 2 mm; PI also returned).
Liquid limit only:
fallcone_limits(
  P = c(5.5, 7.8, 14.8, 22, 32),
  W = c(39.0, 44.8, 52.5, 60.3, 67.0)
)$plot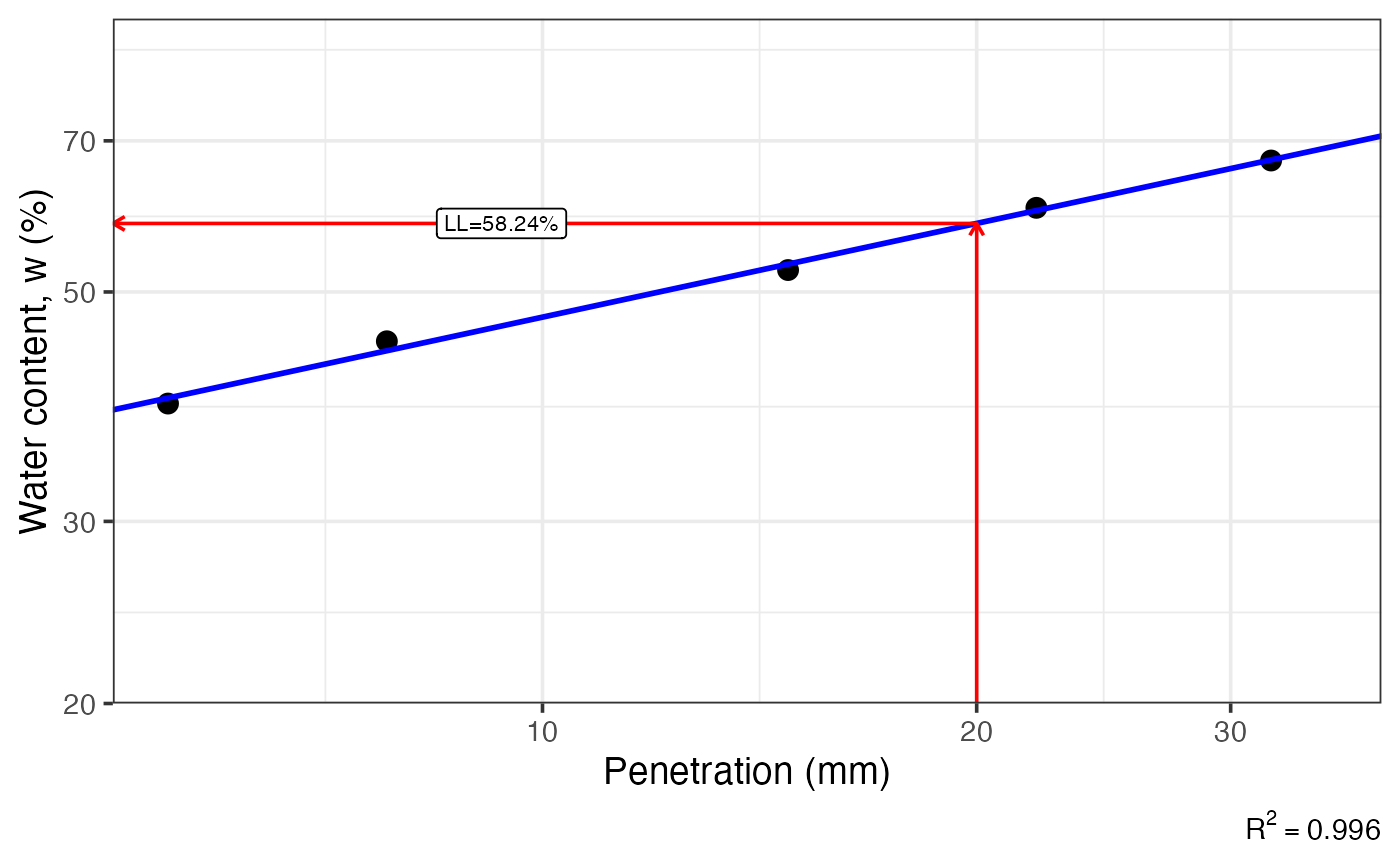
Both limits (LL and PL):
res_fc <- fallcone_limits(
  P = c(5, 9, 15, 22),
  W = c(20, 30, 43, 58),
  limit = 'b'
)
res_fc$plot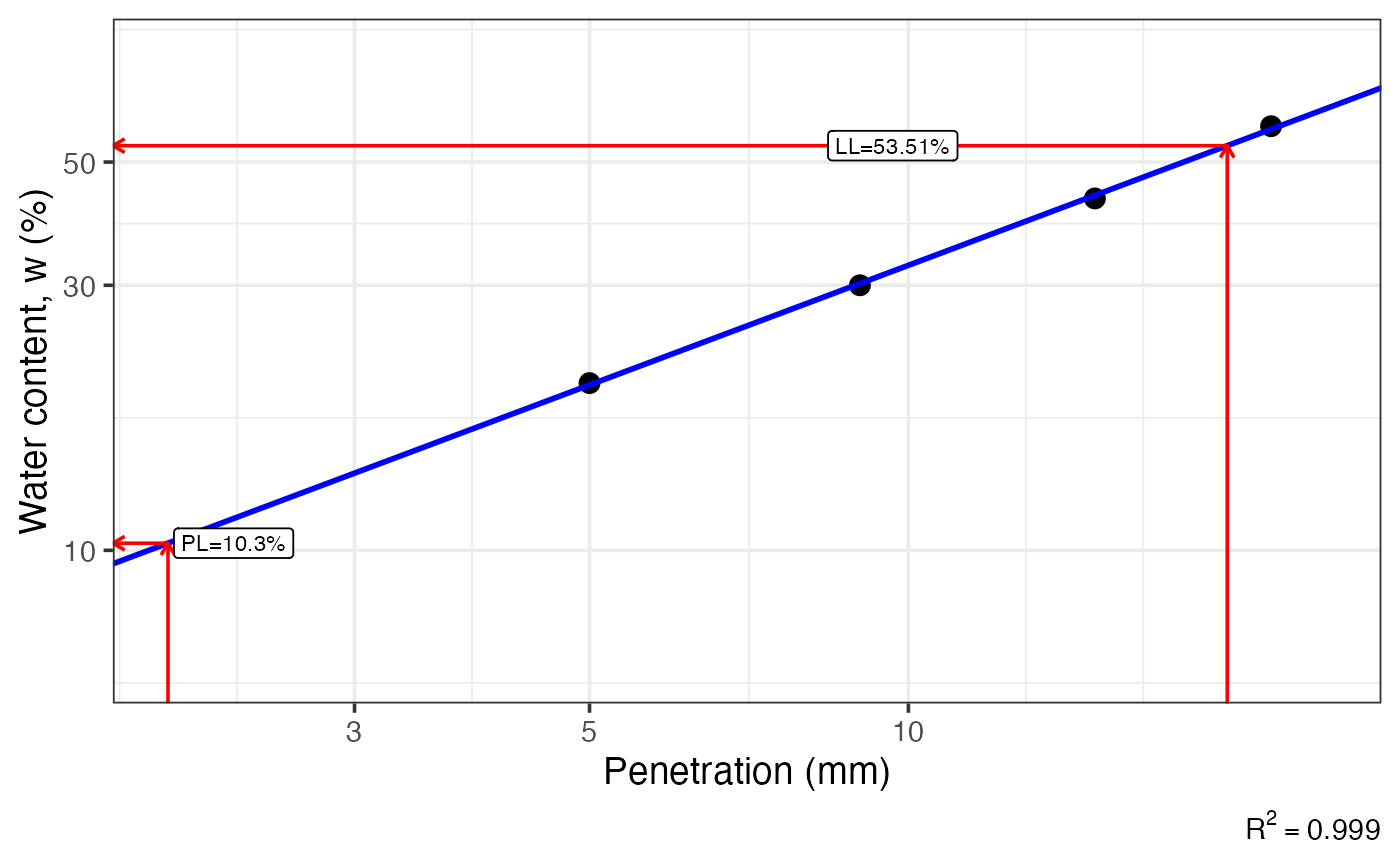
res_fc[c("ll", "pl", "pi")]
#> $ll
#> [1] 53.51
#>
#> $pl
#> [1] 10.3
#>
#> $pi
#> [1] 43.21
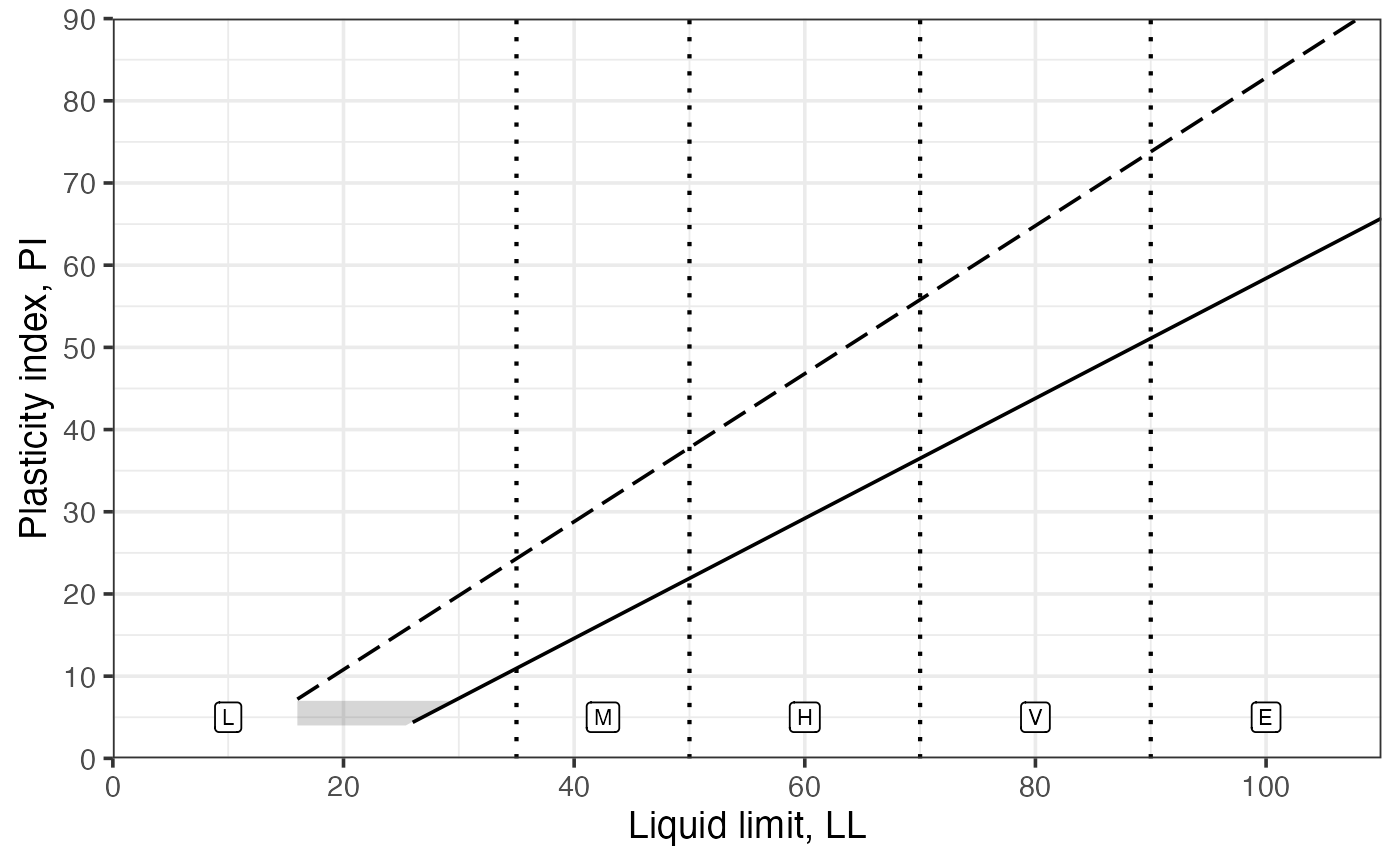
Casagrande plasticity chart
Casagrande_chart produces the standard LL–PI chart with
the A-line, U-line, and CL-ML zone. It returns a ggplot2 object that can
be further annotated.
Reference chart only:
Overlaying sample data:
soil_df <- data.frame(
  ll = c(67, 58, 77, 51),
  pi = c(39, 19, 22, 20),
  sample = paste0("M", 1:4)
)

Casagrande_chart() +
  ggplot2::geom_point(
    ggplot2::aes(ll, pi, shape = sample, colour = sample),
    soil_df,
    size = 3
  ) +
  ggplot2::scale_shape_manual(values = 1:4)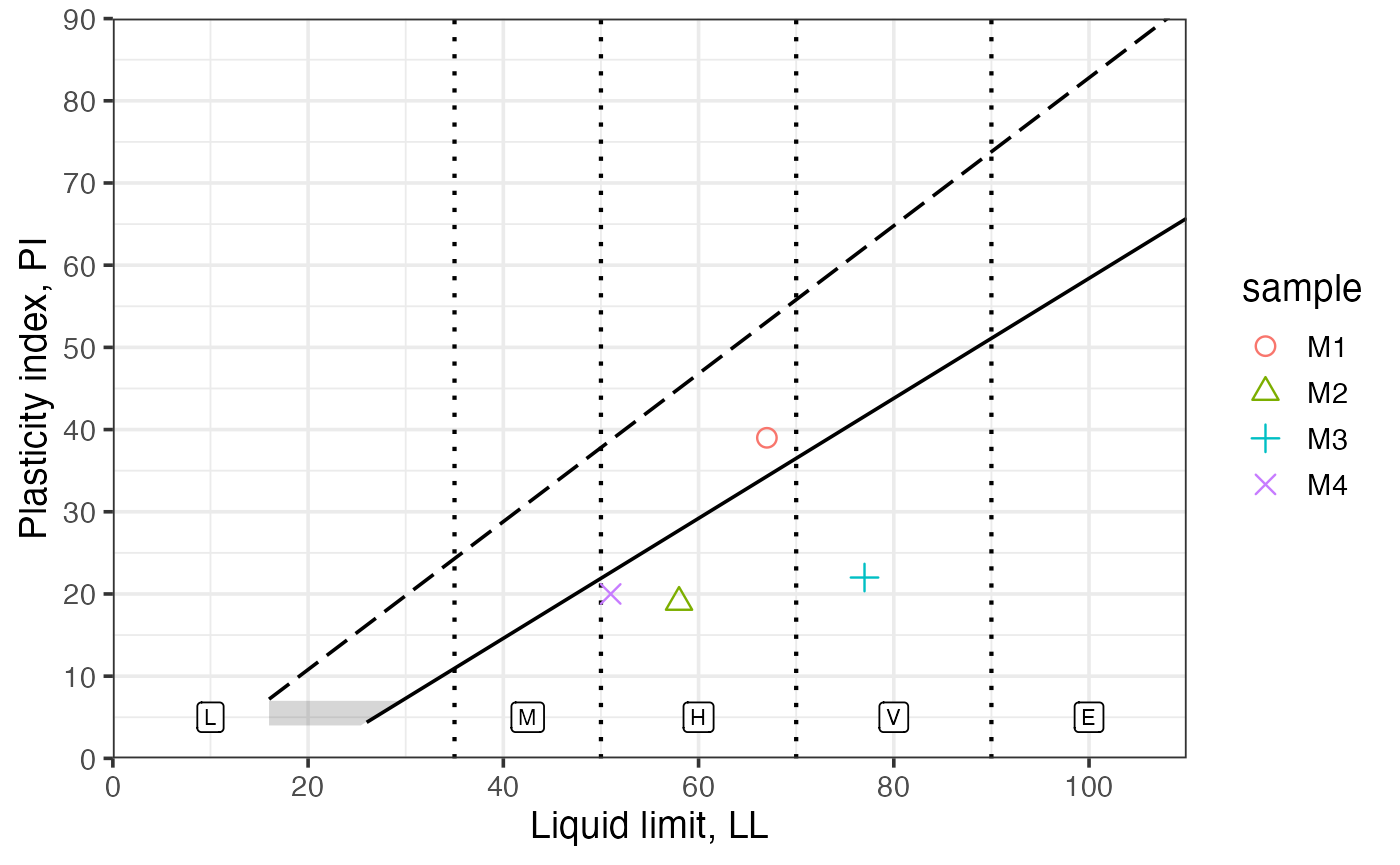
USCS classification
Grain-size distribution graph
particle_size_graph returns an empty ggplot2 template
with a log-scale x-axis and the standard clay/silt/sand/gravel boundary
lines at 0.002, 0.075, and 4.75 mm, ready for gradation data to be
overlaid.
suelo <- dplyr::tribble(
  ~d     , ~pp    , ~sample ,
   0.075 ,  21.74 , "A"     ,
   0.150 ,  25.91 , "A"     ,
   0.250 ,  28.25 , "A"     ,
   0.425 ,  30.92 , "A"     ,
   0.850 ,  36.11 , "A"     ,
   2.000 ,  41.69 , "A"     ,
   4.750 ,  49.67 , "A"     ,
   9.500 ,  56.75 , "A"     ,
  12.700 ,  61.08 , "A"     ,
  25.400 ,  66.95 , "A"     ,
  38.100 ,  83.19 , "A"     ,
  50.800 , 100.00 , "A"     ,
   0.075 ,  42.96 , "B"     ,
   0.150 ,  47.79 , "B"     ,
   0.250 ,  52.18 , "B"     ,
   0.425 ,  55.82 , "B"     ,
   0.850 ,  62.80 , "B"     ,
   2.000 ,  75.11 , "B"     ,
   4.750 ,  87.86 , "B"     ,
   9.500 ,  96.25 , "B"     ,
  12.700 ,  97.97 , "B"     ,
  19.000 , 100.00 , "B"
)

particle_size_graph() +
  ggplot2::geom_point(
    ggplot2::aes(d, pp, shape = sample, colour = sample),
    suelo,
    size = 3
  ) +
  ggplot2::geom_line(
    ggplot2::aes(d, pp, colour = sample),
    suelo
  ) +
  ggplot2::scale_shape_manual(values = 1:2)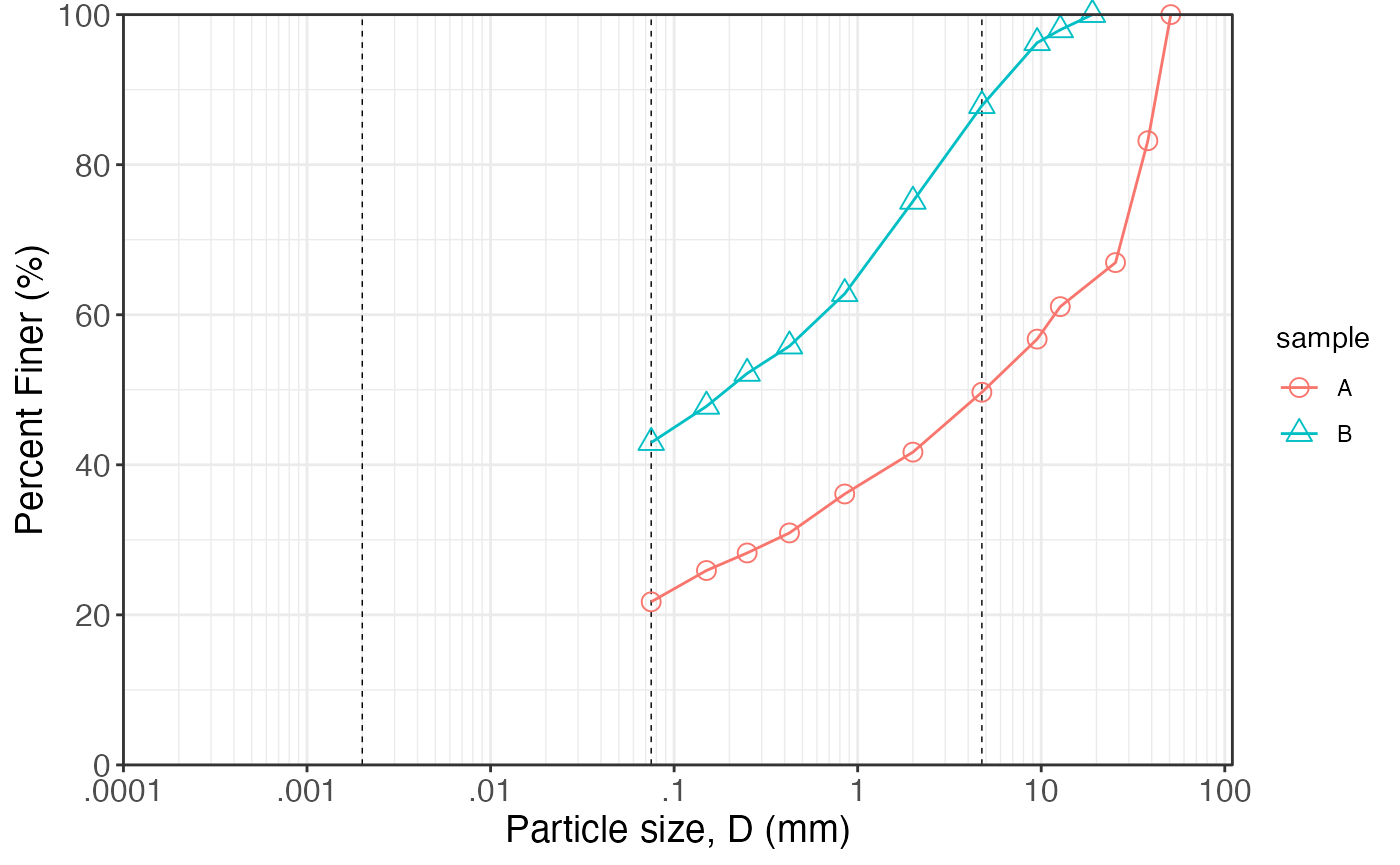
USCS symbol and name
USCS classifies a soil sample according to ASTM D2487.
Supply the grain fractions (pg, ps,
pf) and gradation coefficients (Cu,
Cc) for coarse-grained soils, plus Atterberg limits when
fines exceed 5 %. For fine-grained soils (pf
\ge 50%), only pf, LL, and
PI (or PL) are needed. Grain fractions and
gradation coefficients can also be derived automatically from
size + percent vectors.
Lean clay:
USCS(pg = 15, ps = 34, pf = 51, Cc = 1, Cu = 4, LL = 40, PL = 10)
#> $symbol
#> [1] "CL"
#>
#> $name
#> [1] "Sandy lean clay with gravel"
#>
#> $pg
#> [1] 15
#>
#> $ps
#> [1] 34
#>
#> $pf
#> [1] 51
Well-graded gravel:
USCS(pg = 68, ps = 27, pf = 5, Cc = 2.1, Cu = 6.5, LL = 0, PL = 0, PI = 0)
#> $symbol
#> [1] "GW-GC"
#>
#> $name
#> [1] "Well-graded gravel with clay & sand (or silty clay & sand)"
#>
#> $pg
#> [1] 68
#>
#> $ps
#> [1] 27
#>
#> $pf
#> [1] 5
#>
#> $Cu
#> [1] 6.5
#>
#> $Cc
#> [1] 2.1
Fat clay:
USCS(pg = 2, ps = 8, pf = 90, LL = 65, PI = 35)
#> $symbol
#> [1] "CH"
#>
#> $name
#> [1] "Fat clay"
#>
#> $pg
#> [1] 2
#>
#> $ps
#> [1] 8
#>
#> $pf
#> [1] 90
Classification from grain-size distribution data:
Direct shear
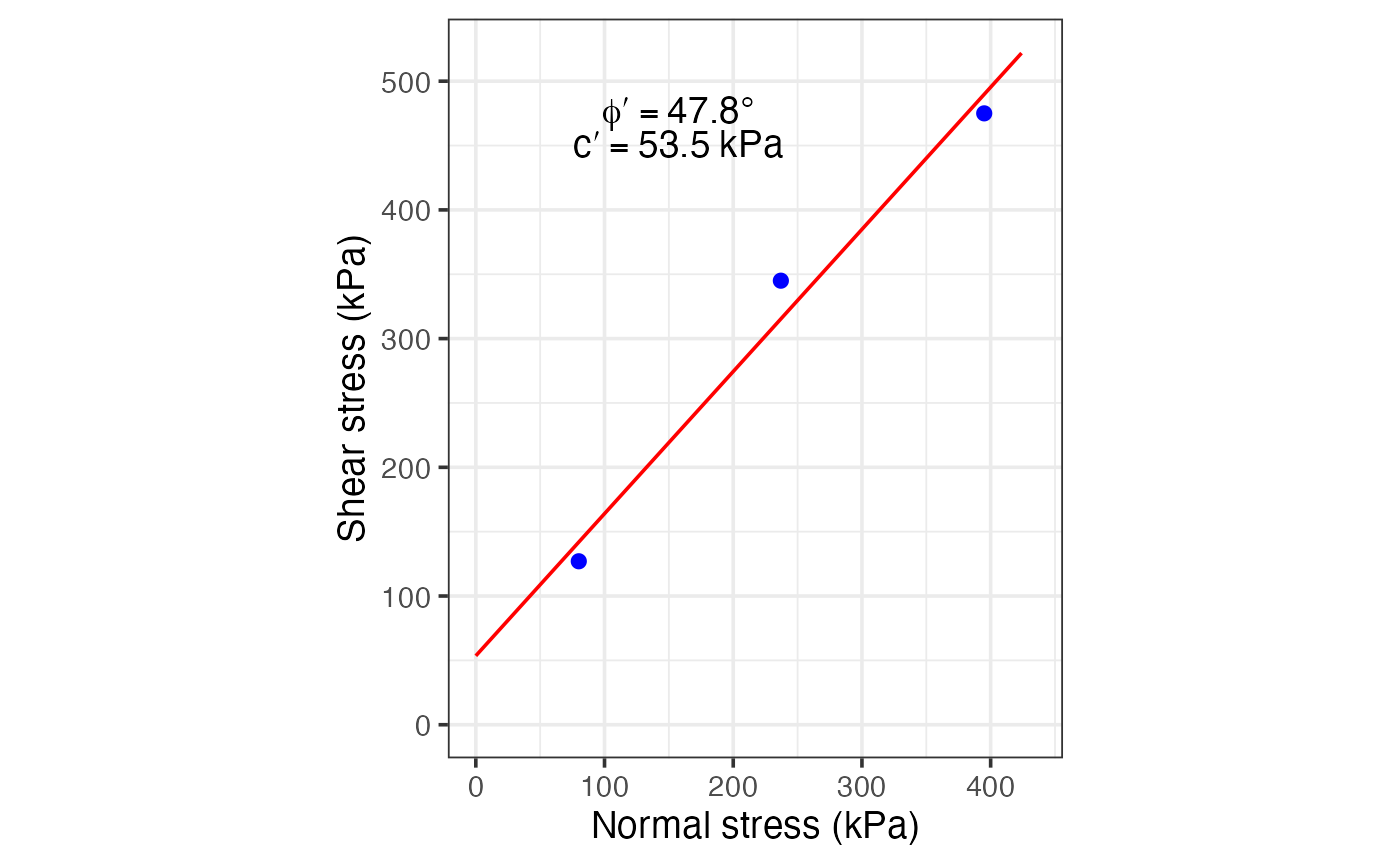
The functions for direct shear are more for visualizing the results
rather than to process them. The user should analyze the raw data and
provide the normal stress (sig.n, \sigma_n) - shear stress (tau,
\tau) pairs.
The first function plots the resulting (\sigma,\tau) pairs and adds a line of best fit for the Mohr-Coulomb criterion (\tau=c+\sigma_n tan\phi). If the line of best fit estimates an intercept of less than 0 (c<0), the function automatically assigns c=0, as this is not a possible solution. Also, the estimated parameters (c,\phi) are added to the plot.
The second function adds on top of the first one by drawing the Mohr circles for each of the (\sigma,\tau) pairs.
DS_Mohr_plot(sig.n = c(80, 237, 395), tau = c(127, 345, 475))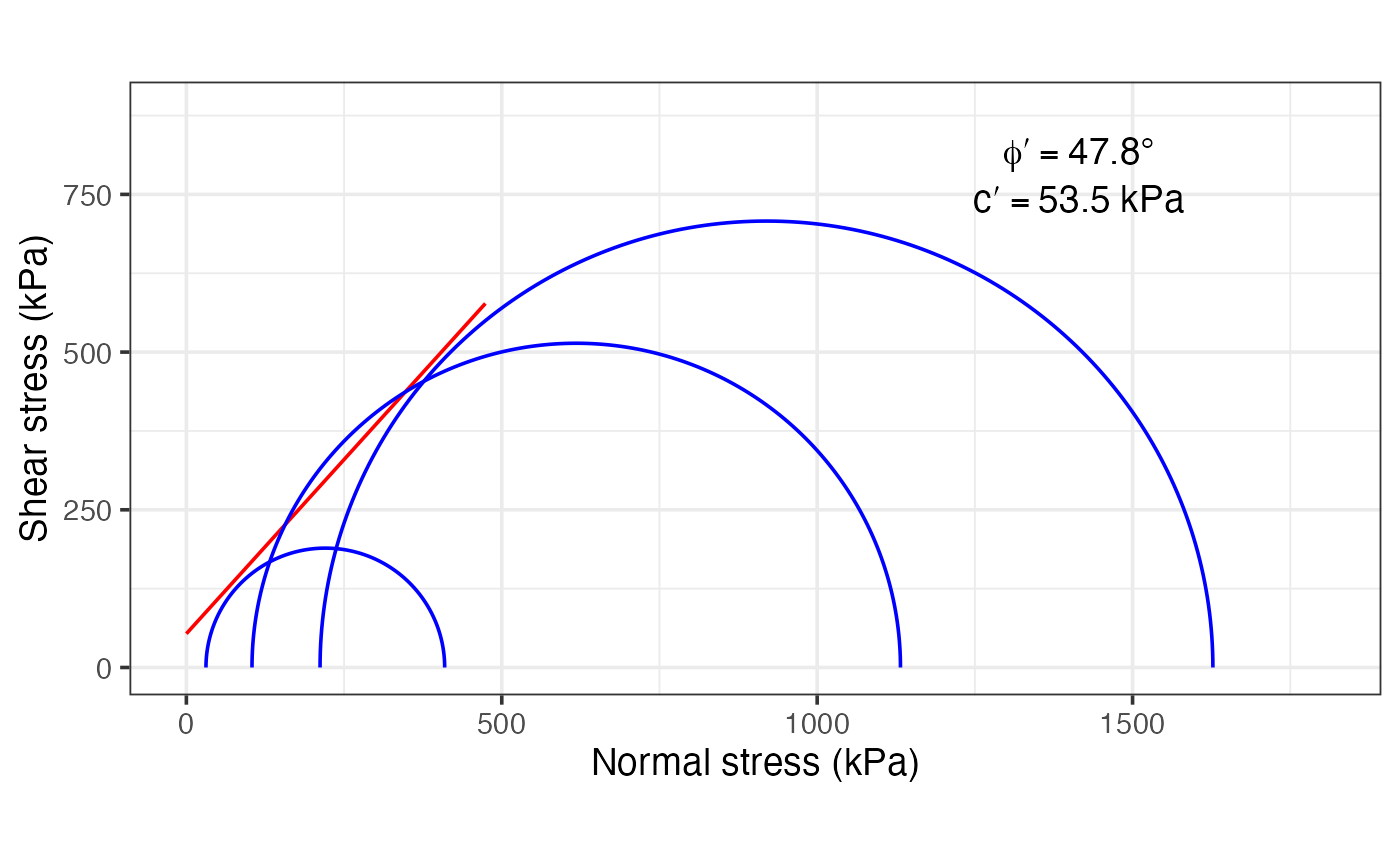
Mohr circle
The idea here is to provide a way to solve simple Mohr circle’s problems for the given normal stresses, shear stress, and rotation angle. The function returns a plot and the results for the given problem and parameters.
We can define some values to use:
sigx = 143.6
sigy = 100.5
tauxy = -14.4
theta = -35
where sigx corresponds to the mayor normal stress,
sigy corresponds to the minor normal stress,
tauxy corresponds to the shear stress, and
theta is the rotation angle for which to find the
stresses.
In the first example the rotation is not applied:
Mohr_Circle(sigx, sigy, tauxy)
#> $results
#>     sig1   sig2 sig_theta tau_theta tau_max
#> 1 147.97 96.132     143.6     -14.4  25.918
#>
#> $figure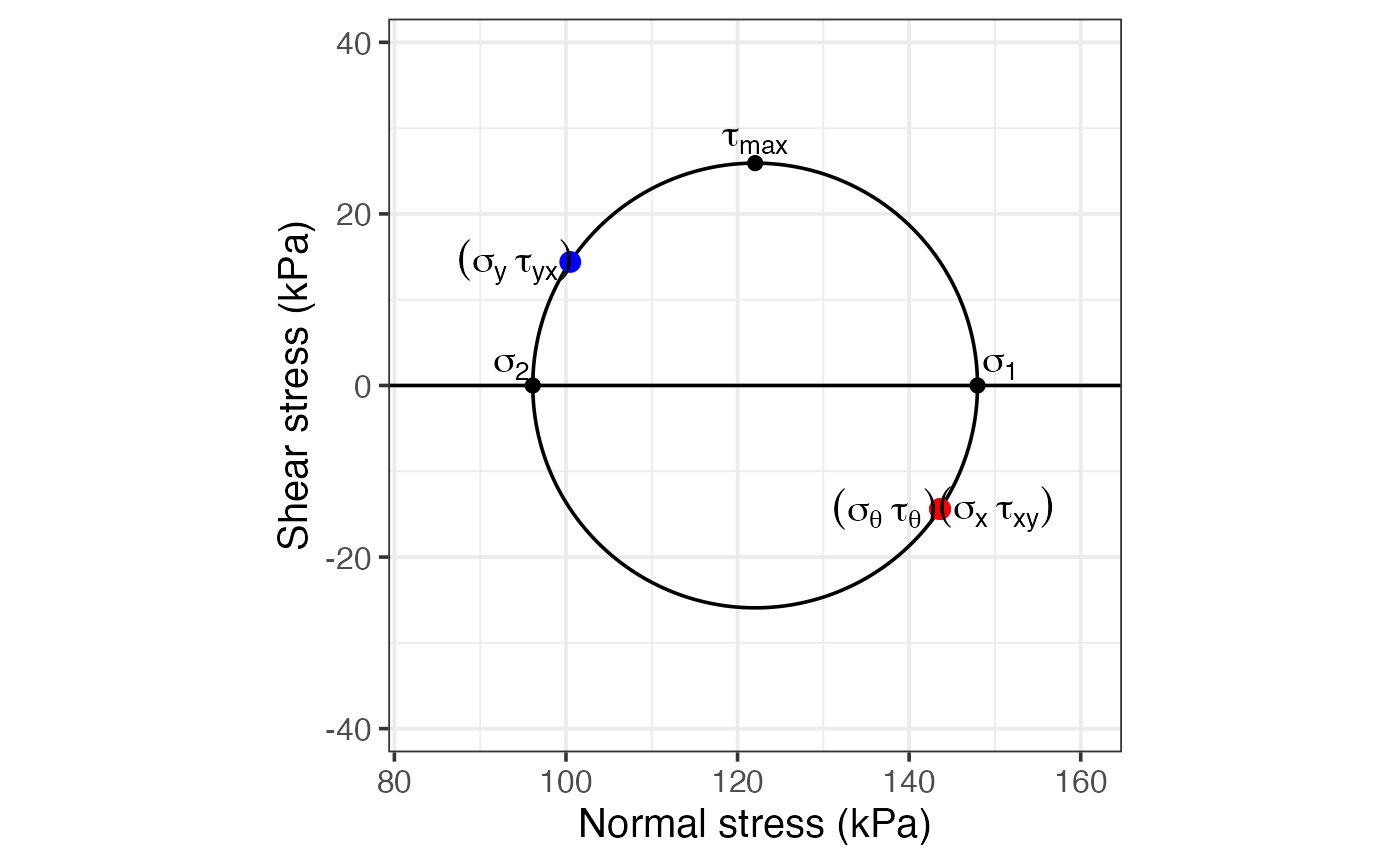
In the second example the rotation is applied:
Mohr_Circle(sigx, sigy, tauxy, theta)
#> $results
#>     sig1   sig2 sig_theta tau_theta tau_max
#> 1 147.97 96.132    115.89   -25.175  25.918
#>
#> $figure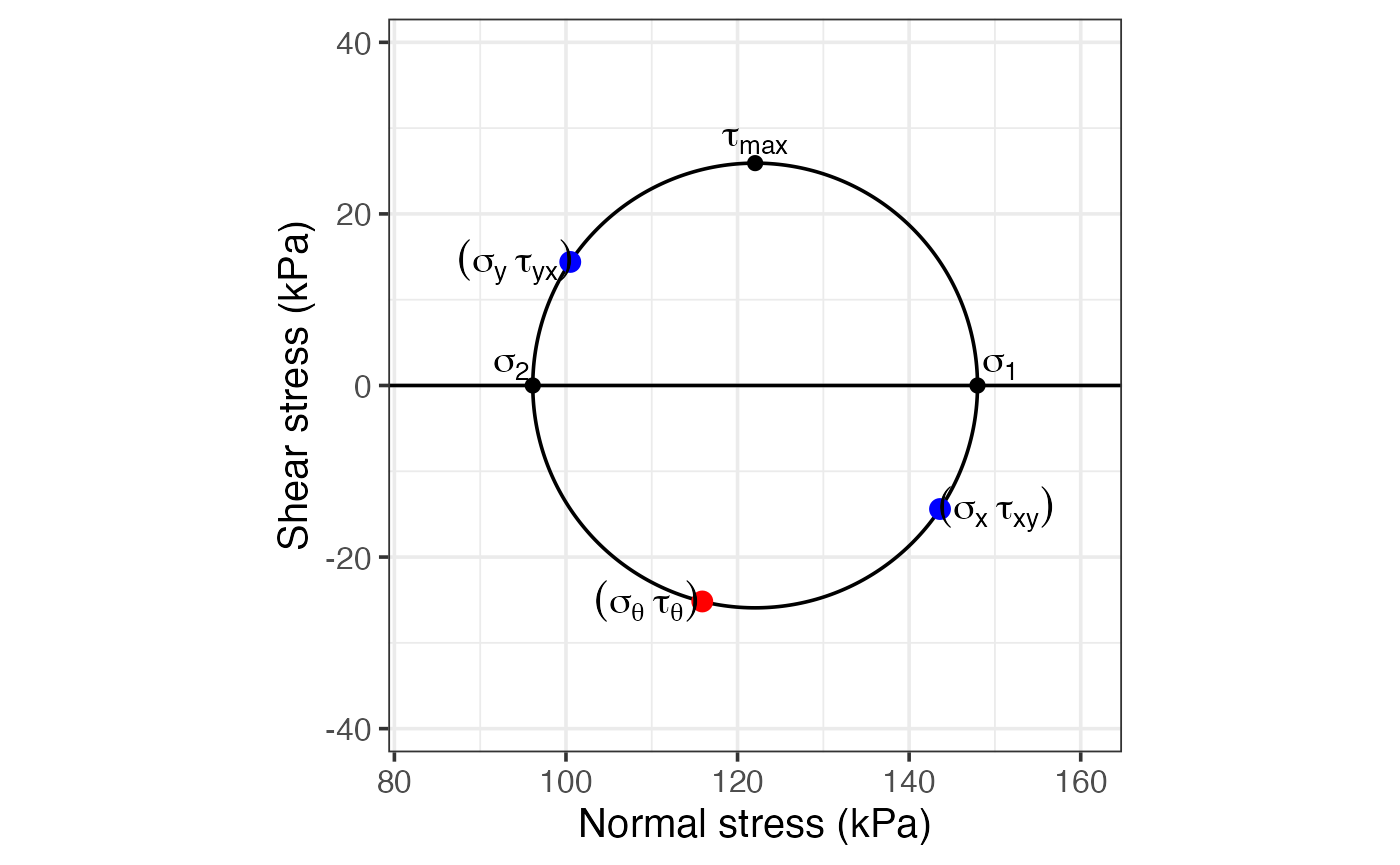
Clay activity, expansion, and collapse
Three chart functions help classify the swelling and collapse
potential of fine-grained soils. All return ggplot2 objects that can be
extended with + to overlay sample data.
Clay activity chart
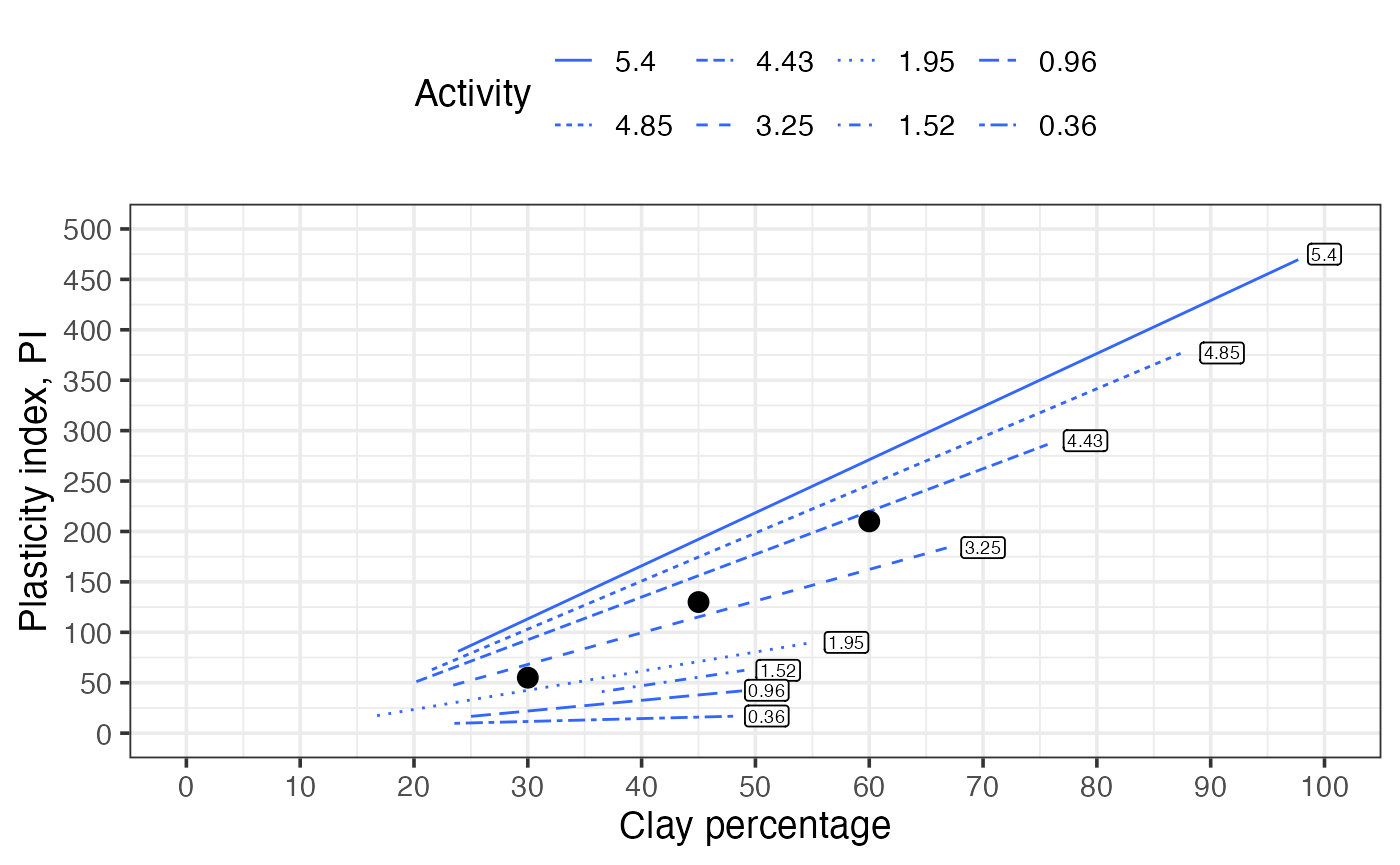
clay_activity draws PI vs clay percentage with eight
reference activity lines (fitted by regression on built-in data).
Activity A = PI / \text{clay\%}
reflects the mineralogy of the clay fraction.
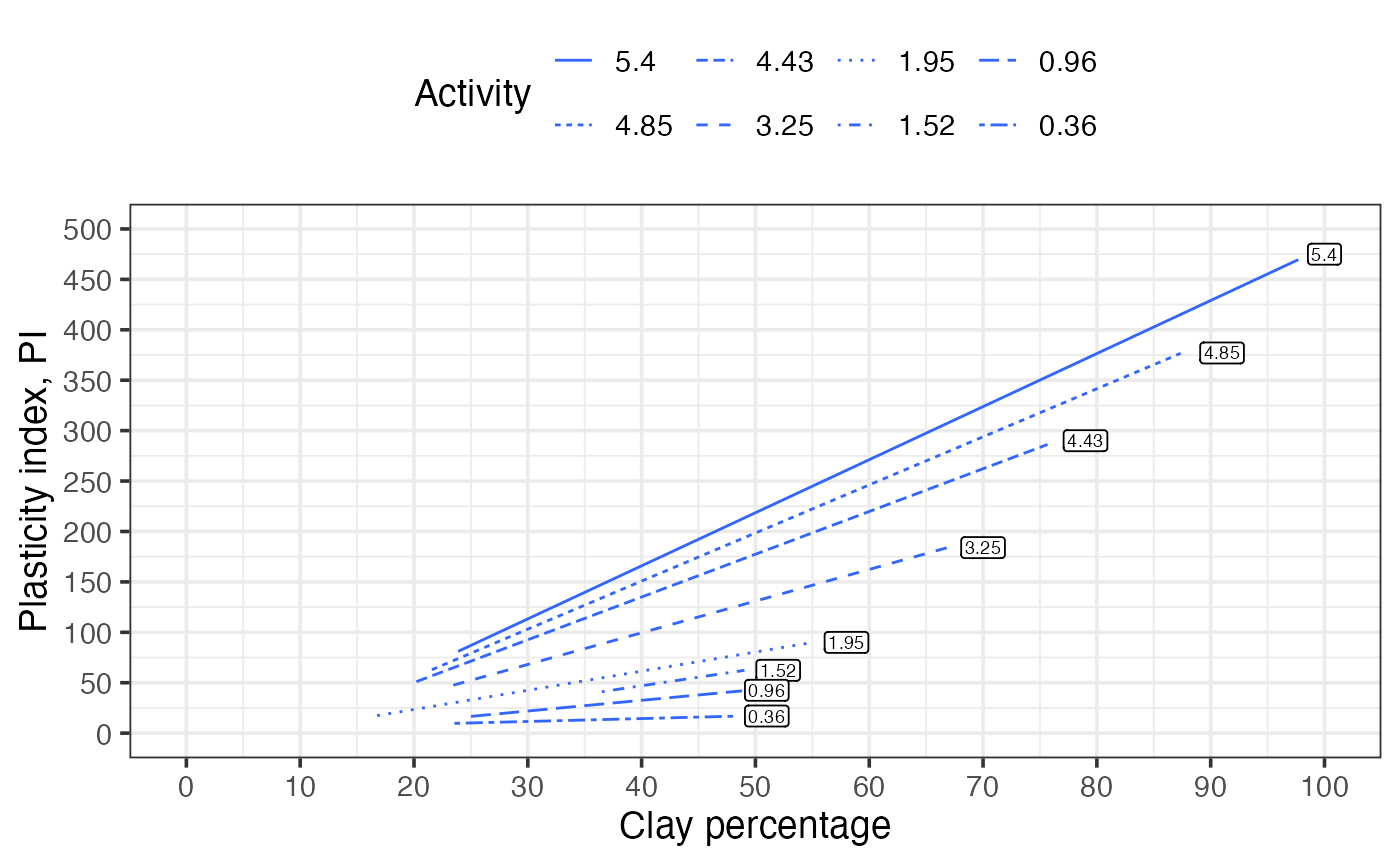
Overlay sample points:
act_dat <- data.frame(
  clay = c(30, 45, 60),
  pi = c(55, 130, 210)
)

clay_activity() +
  ggplot2::geom_point(
    ggplot2::aes(clay, pi),
    act_dat,
    size = 3,
    inherit.aes = FALSE
  )
Soil swelling potential chart
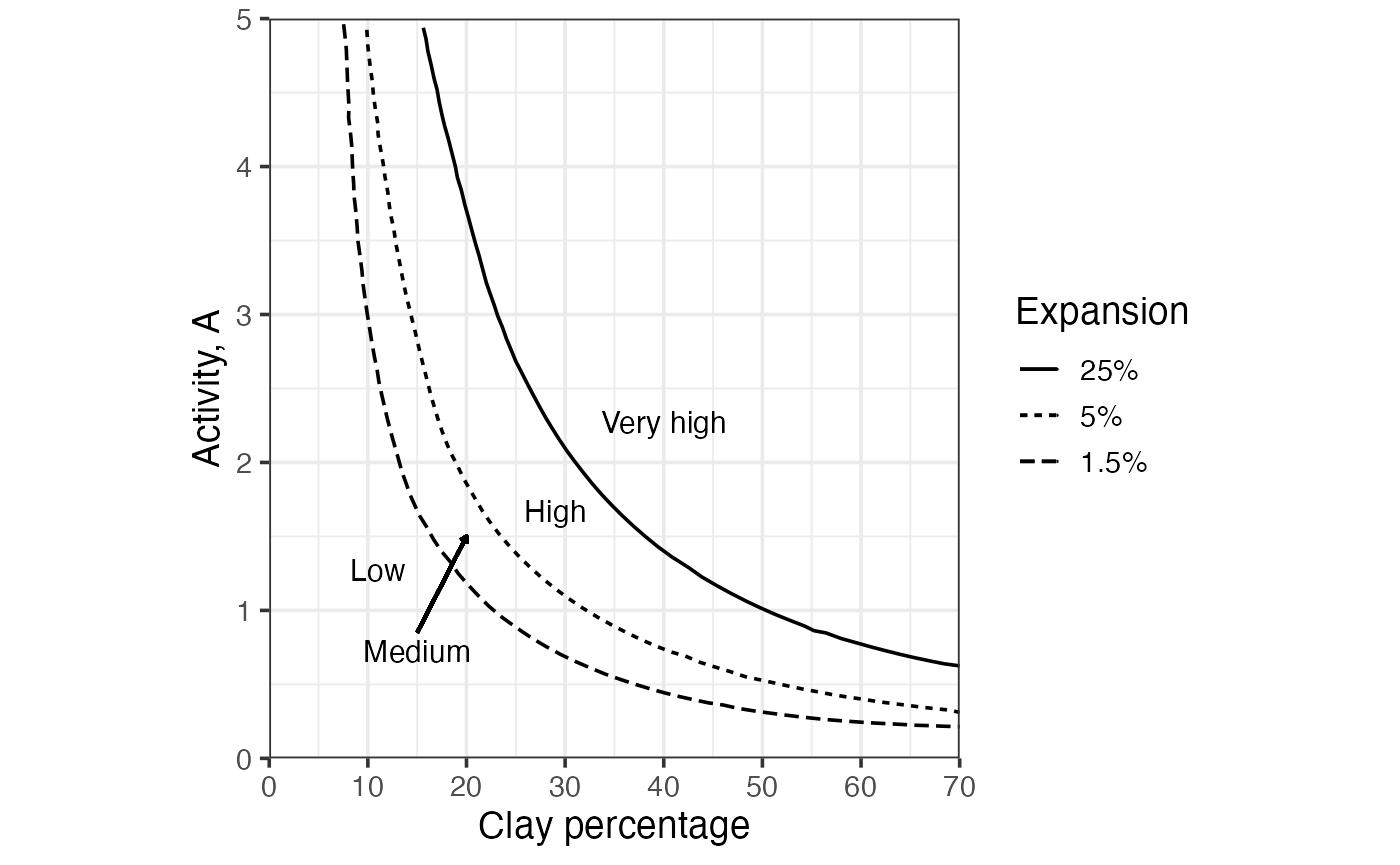
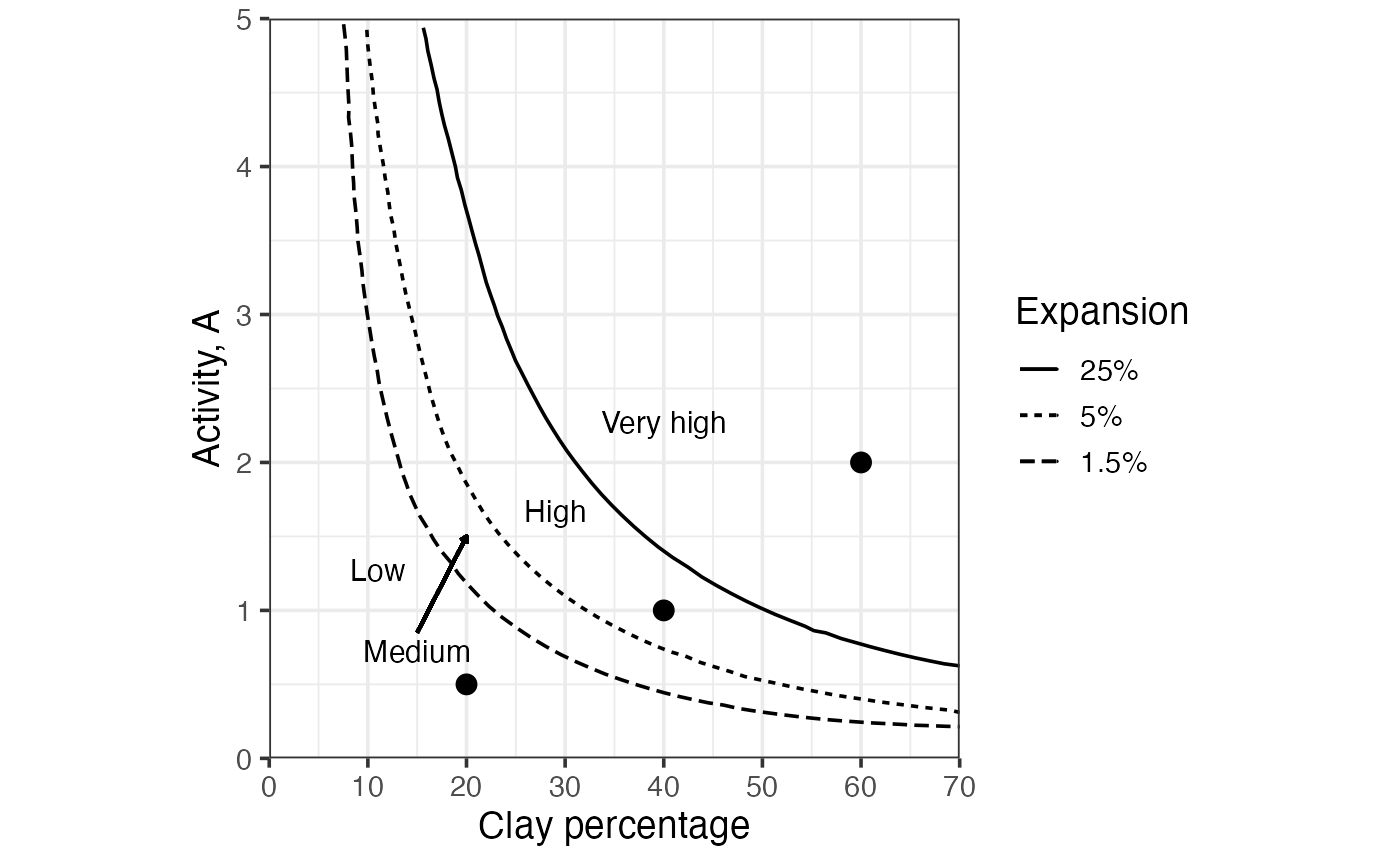
soil_swelling draws clay activity vs clay percentage
with three boundary curves separating the Low, Medium, High, and Very
High swelling potential zones.
Overlay sample points:
swell_dat <- data.frame(
  clay = c(20, 40, 60),
  activity = c(0.5, 1.0, 2.0)
)

soil_swelling() +
  ggplot2::geom_point(
    ggplot2::aes(clay, activity),
    swell_dat,
    size = 3,
    inherit.aes = FALSE
  )
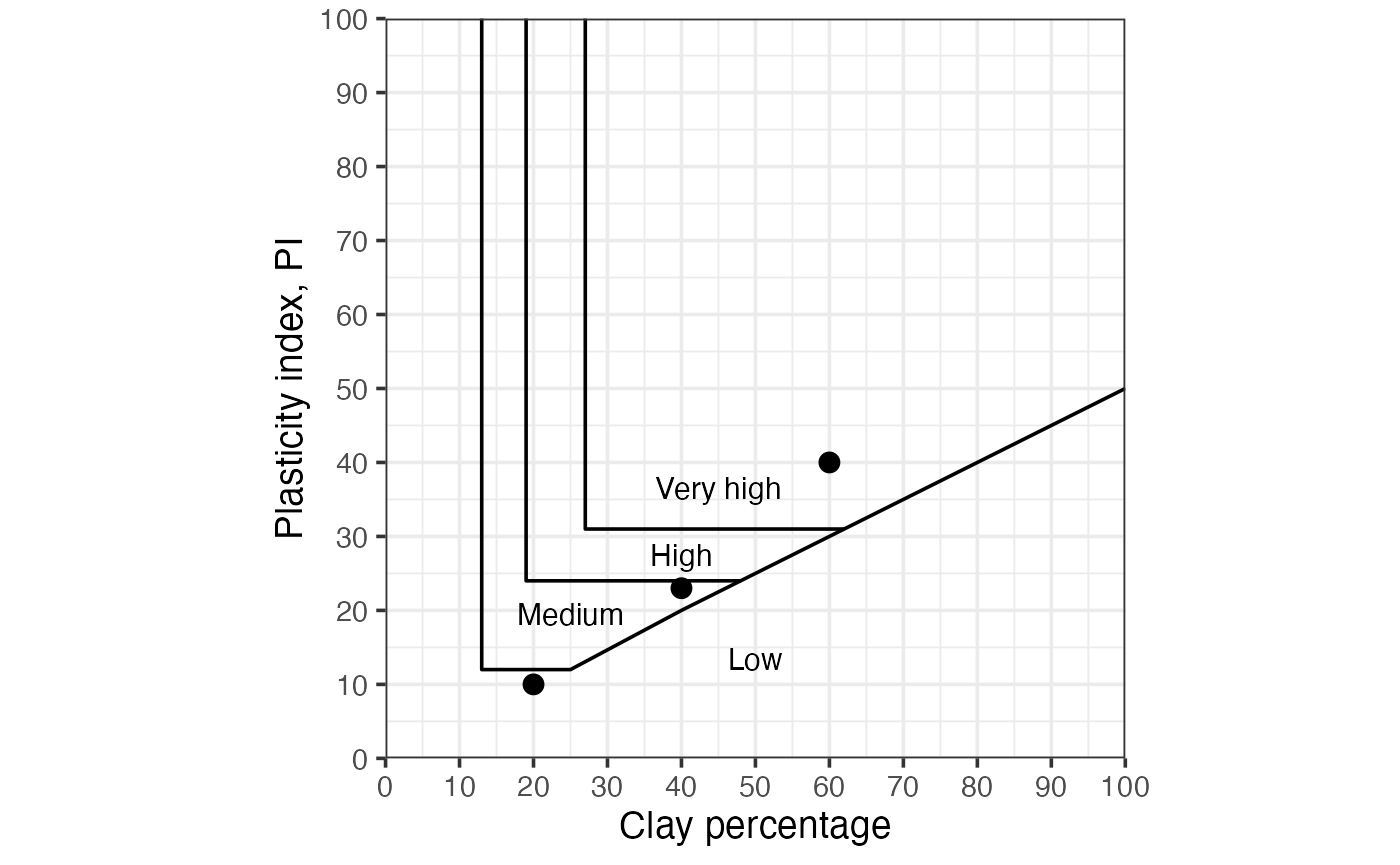
Soil expansion potential chart
soil_expansion draws PI vs clay percentage with four
boundary curves for Low, Medium, High, and Very High expansion potential
zones.
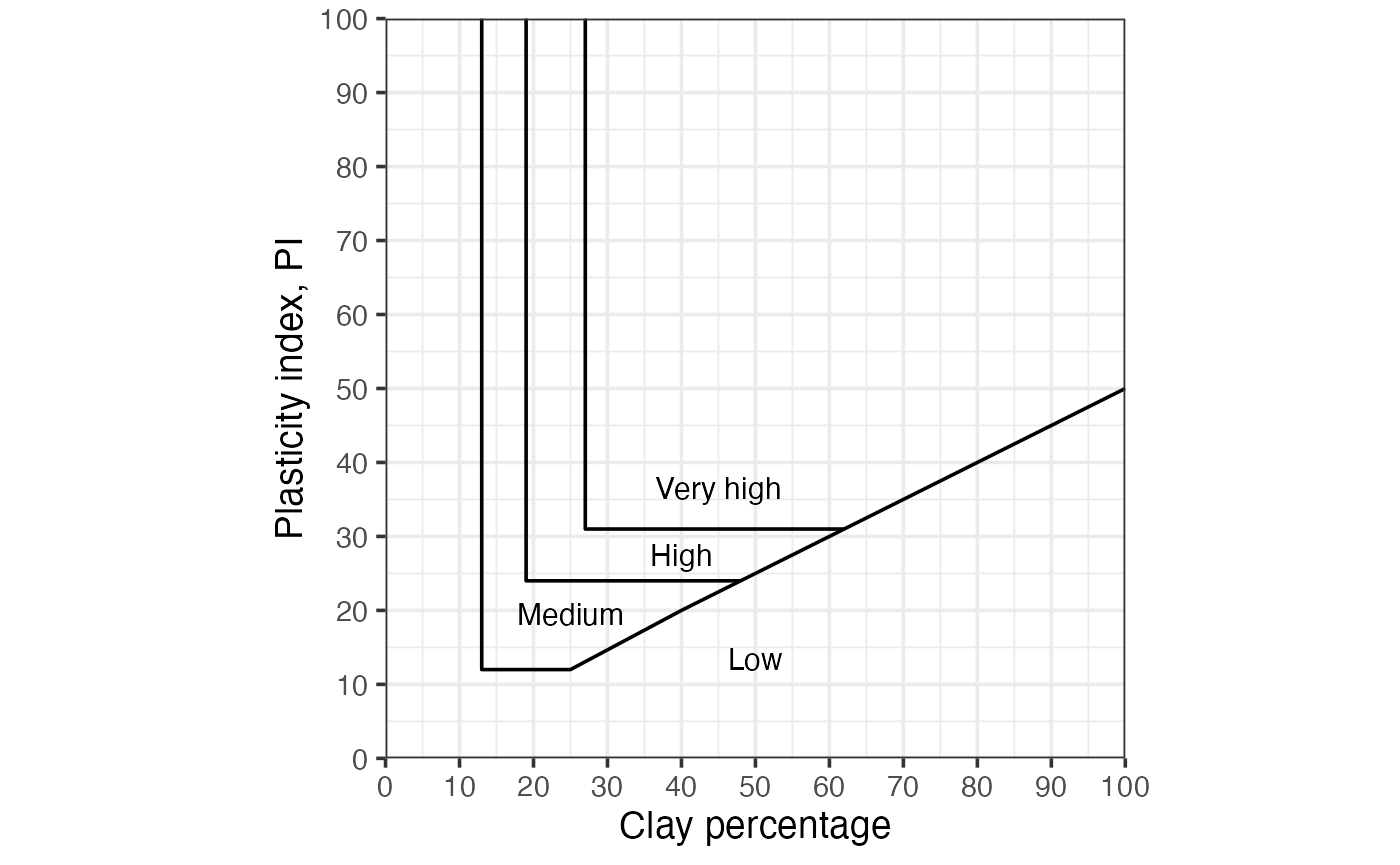
Overlay sample points:
exp_dat <- data.frame(
  clay = c(20, 40, 60),
  pi = c(10, 23, 40)
)

soil_expansion() +
  ggplot2::geom_point(
    ggplot2::aes(clay, pi),
    exp_dat,
    size = 3,
    inherit.aes = FALSE
  )
Soil collapse potential chart
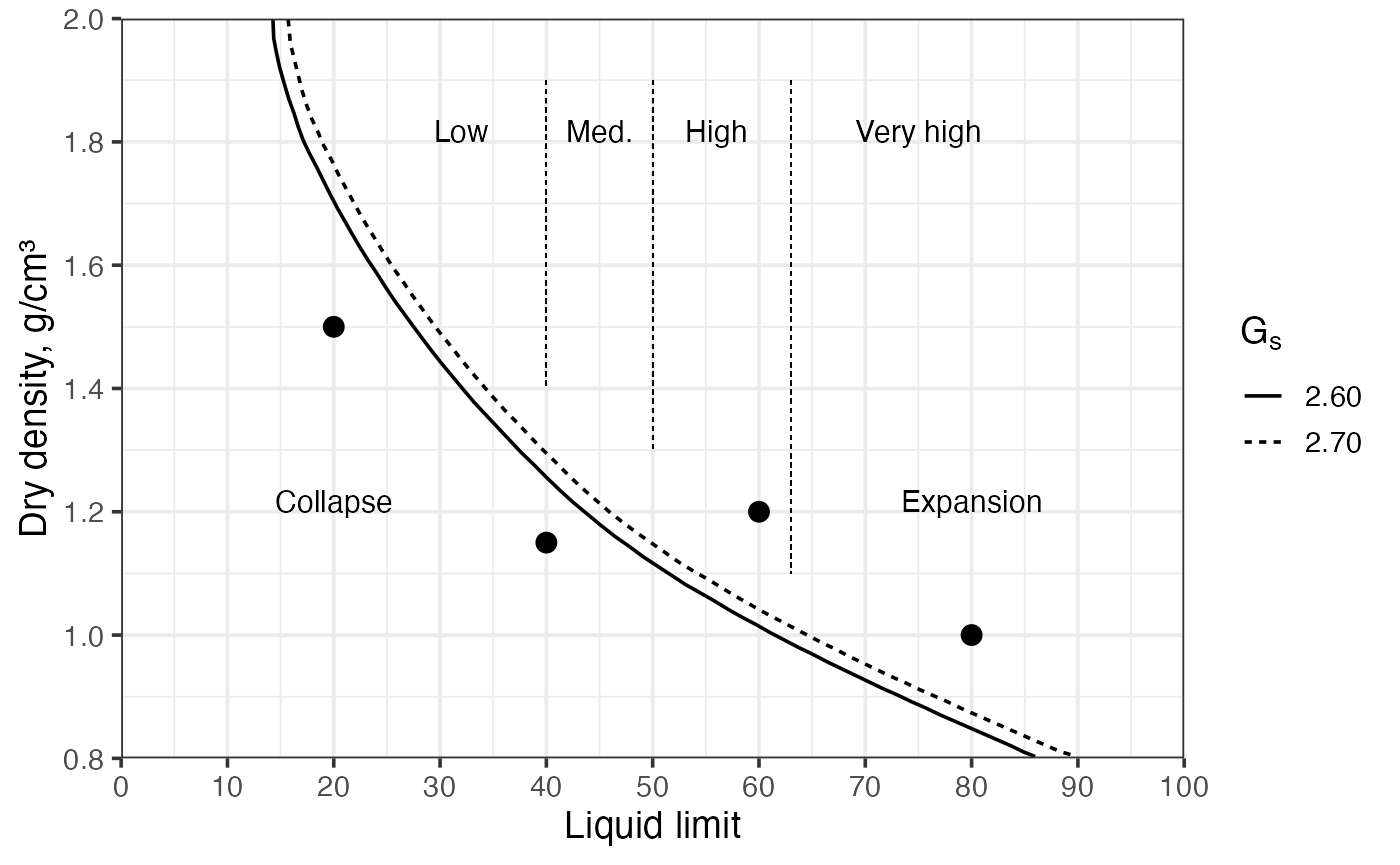
soil_collapse draws dry density vs liquid limit with two
boundary curves (G_s = 2.60 and G_s = 2.70) and dashed reference lines at LL
= 40, 50, and 63, separating zones of Low, Medium, High, and Very High
collapse and expansion potential.
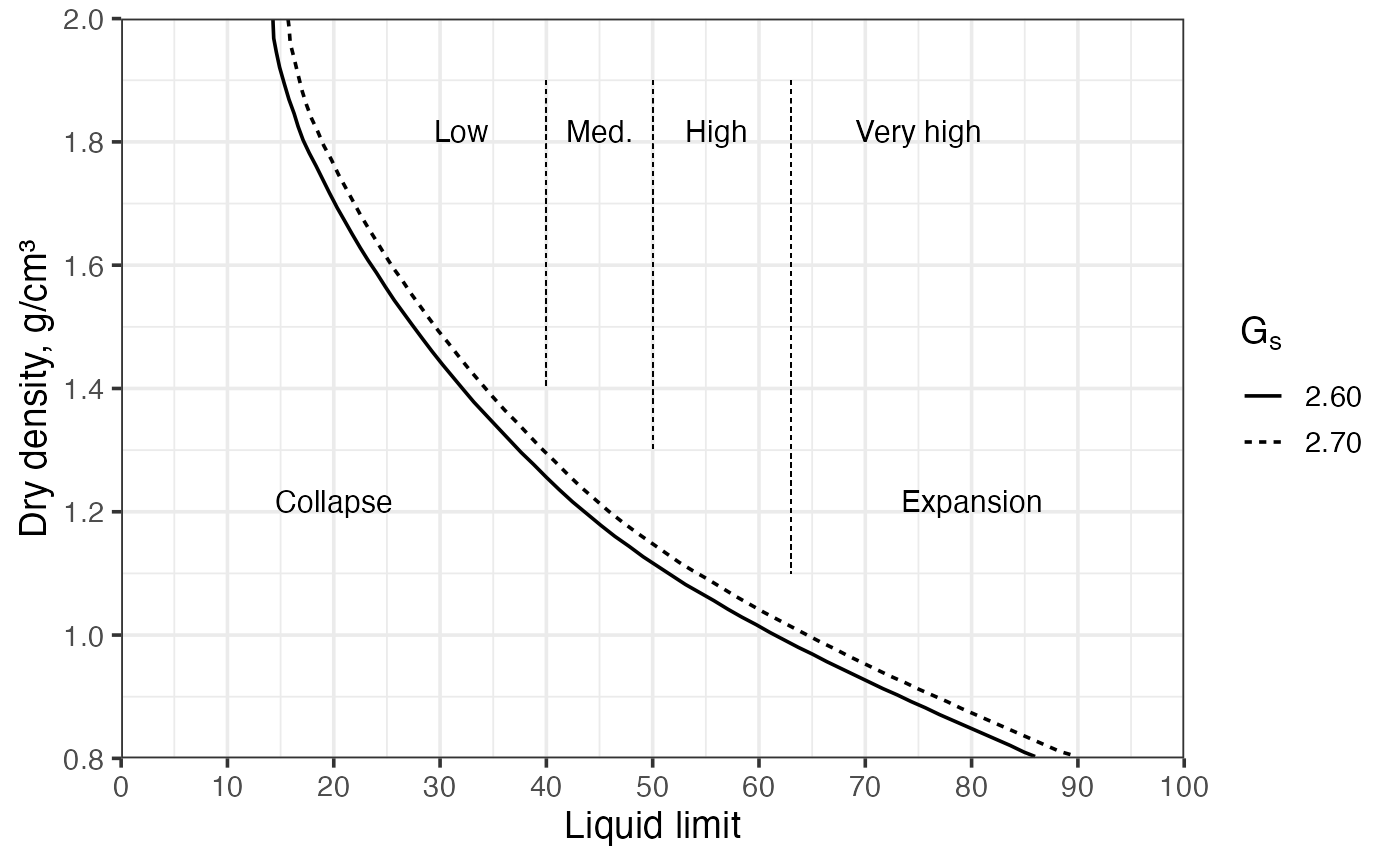
Overlay sample points:
coll_dat <- data.frame(
  ll = c(20, 40, 60, 80),
  dry = c(1.50, 1.15, 1.20, 1.00)
)

soil_collapse() +
  ggplot2::geom_point(
    ggplot2::aes(ll, dry),
    coll_dat,
    size = 3,
    inherit.aes = FALSE
  )
Shinyapp
A shinyapp using these functions can be accessed at https://maximiliano-01.shinyapps.io/soil_mechanics/.